The dotMux manual
Everything dotMux can do, in the order you'll meet it — from your first connection to driving splits from a trackpad. Skim the contents, or read it top to bottom in about twenty minutes.
§1Get connected
direct SSH · host records & folders · switching between hosts · passwords & keys · Secure Enclave · host-key trust · background re-attach
dotMux is a real SSH client. It connects straight from your device to your own servers — there's no dotMux account, no relay, and no backend in the middle. Everything below happens on your device, and between it and your machine.
Add your first host
On the connections list, tap Add Host and fill in the essentials:
- A display name, the hostname or IP, and the port (22 unless you've changed it).
- The username you log in as.
- A credential — pick one you've saved, tap Manage credentials… to add one, or leave it as None to be asked for a password when you connect.
Save the host, then tap it to connect. Hosts are just saved entries: swipe to edit one any time, and renaming or re-pointing a host you already have never costs anything.
Once you have more than a handful, put them in folders — Homelab, Production, one per client. A host belongs to at most one folder, folders collapse, and each folder header carries a count of how many of its hosts are currently connected, so a glance at the collapsed list still tells you what's live.

Switching between hosts
Moving from one server to another is a single tap, and it costs nothing: no reconnect, no second Face ID prompt, no waiting for a shell to come back. Two ways to do it:
- From the connections list — connected hosts carry a live dot, so you can see what's running before you tap. Tapping a live host drops you back into the session you left, exactly as you left it.
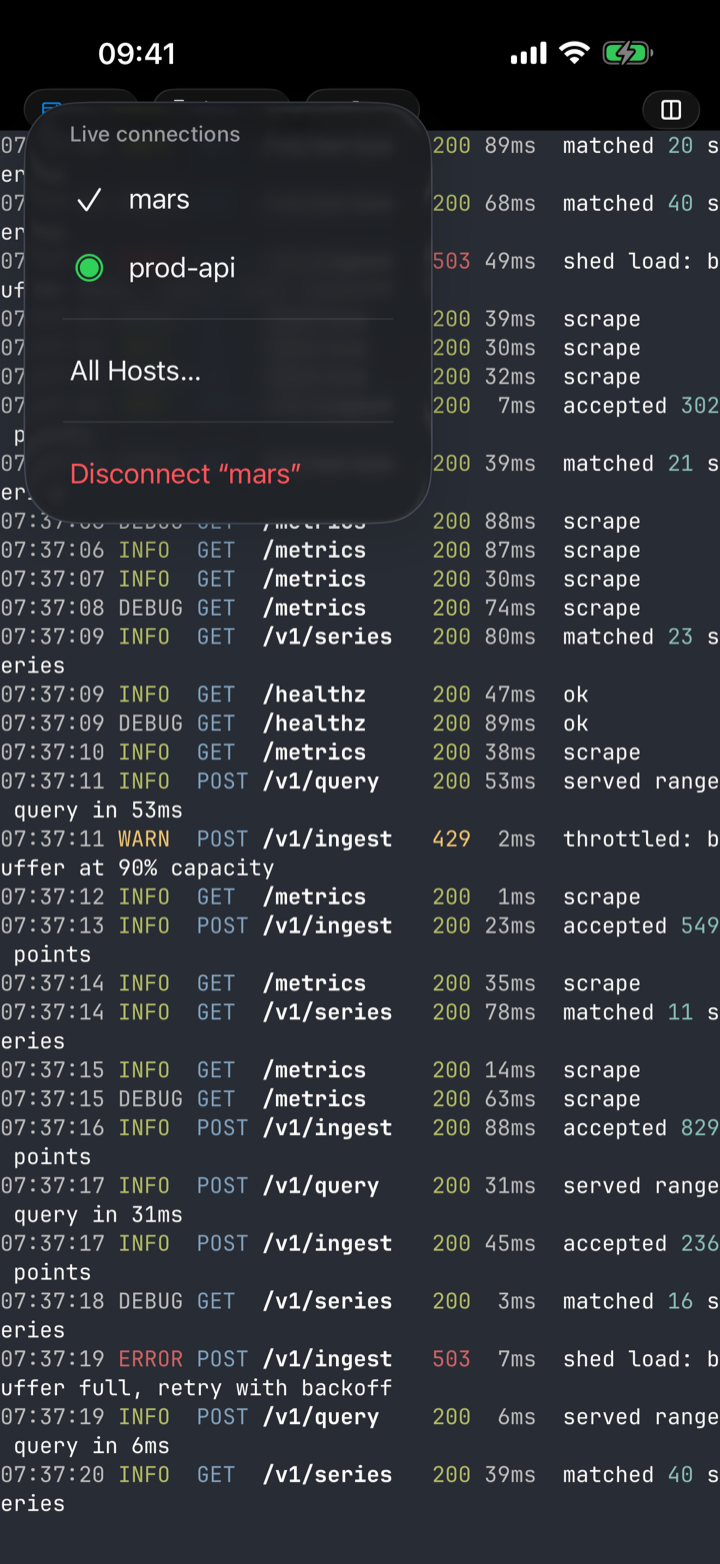
- Without leaving the terminal — the connection pill in the tab bar names the host you're in; tap it for the live-connections menu and jump straight to any other open host. All Hosts… returns to the list, and Disconnect ends just this one.
That speed comes from dotMux holding as many connections open as you like. Leaving a terminal — backing out to the list, opening Settings, switching to another host — does not disconnect it: the shells keep running, and so does everything inside them, which is why there is nothing to re-establish when you come back.
Passwords, keys, and the Secure Enclave
dotMux supports three kinds of credential, all stored on-device (§9 covers exactly where):
- Passwords — saved in the Keychain, or typed fresh at connect time. A host with no usable credential prompts you when you connect; tick Save password and it's remembered only after the login actually succeeds, so a wrong password is never stored. (Password auth uses SSH's standard password method — servers set up for keyboard-interactive-only auth will reject it, so use a key on those.)
- ed25519 and ECDSA keys — import by pasting the key text or picking the file from Files. ECDSA covers the NIST P-256 curve (ecdsa-sha2-nistp256), the one a Secure Enclave key also uses, so a key you already deploy to servers works here unchanged. Passphrase-protected keys are fine: dotMux asks for the passphrase once at import and never stores it. RSA keys are intentionally not supported — modern OpenSSH disables the legacy ssh-rsa SHA-1 signature by default, so a stored RSA key would look usable but silently fail; dotMux rejects it at import rather than pretend it works.
- Secure Enclave keys — generate a non-exportable P-256 key right on the device. Signing happens inside the chip; the private key never exists outside the enclave, even to dotMux. Tap Copy public key and add the printed line to your server's authorized_keys.

Trusting a server
The first time you reach a server, dotMux shows its SHA-256 fingerprint and asks you to trust it — the standard trust-on-first-use handshake. From then on that endpoint is pinned: if its key ever changes, dotMux treats it as a hard mismatch and refuses rather than connect silently, so a man-in-the-middle can't slip past. If you'd rather not confirm every brand-new host by hand, turn on Settings → Security → Trust New Servers Automatically (like OpenSSH's accept-new) — it silently trusts unknown hosts while still catching key changes.
Everything you've trusted is listed on the known-hosts screen (Settings → Security), one row per endpoint with its key type and fingerprint. Forget a row and the next connection to that server asks you to trust it again — which is exactly what you want after a server is rebuilt or re-keyed, and it's the one way past a hard key-mismatch refusal.
When you come back
iOS suspends and sometimes kills backgrounded apps to save power, and dotMux doesn't fight it. Your work is safe because it runs on the server, inside tmux. When you return, dotMux re-attaches to your session and rebuilds your tabs and panes where you left them — long-running jobs kept running the whole time. (A plain shell, control mode off, has no server-side session to re-attach to, so after a suspension it shows the disconnected state and waits for you to reconnect deliberately. dotMux won't silently drop you into a different fresh shell.)
No tmux? No problem
If a host doesn't have tmux installed, or control mode can't start for any reason, dotMux falls back gracefully to a plain terminal. You stay connected — just without the native tabs and panes.
§2Windows, panes & sessions
native tabs · live window & pane previews · split, resize, close & equalize panes · the iPhone minimap · focus sync · sessions · scrollback · shared sizing
dotMux talks to tmux over control mode (tmux -CC), so it doesn't draw a picture of a terminal — it owns the layout. Every tmux window becomes a native tab, and every pane becomes a native view you can tap, swipe, split, and resize.
Windows are tabs
On iPad you get a tab strip across the top; on iPhone, a window menu in the tab bar. Tap to switch — no Ctrl-B anywhere. Create, rename, and close windows from the same place; closing always asks first, because the processes inside die with it.
Pick a window by what's in it
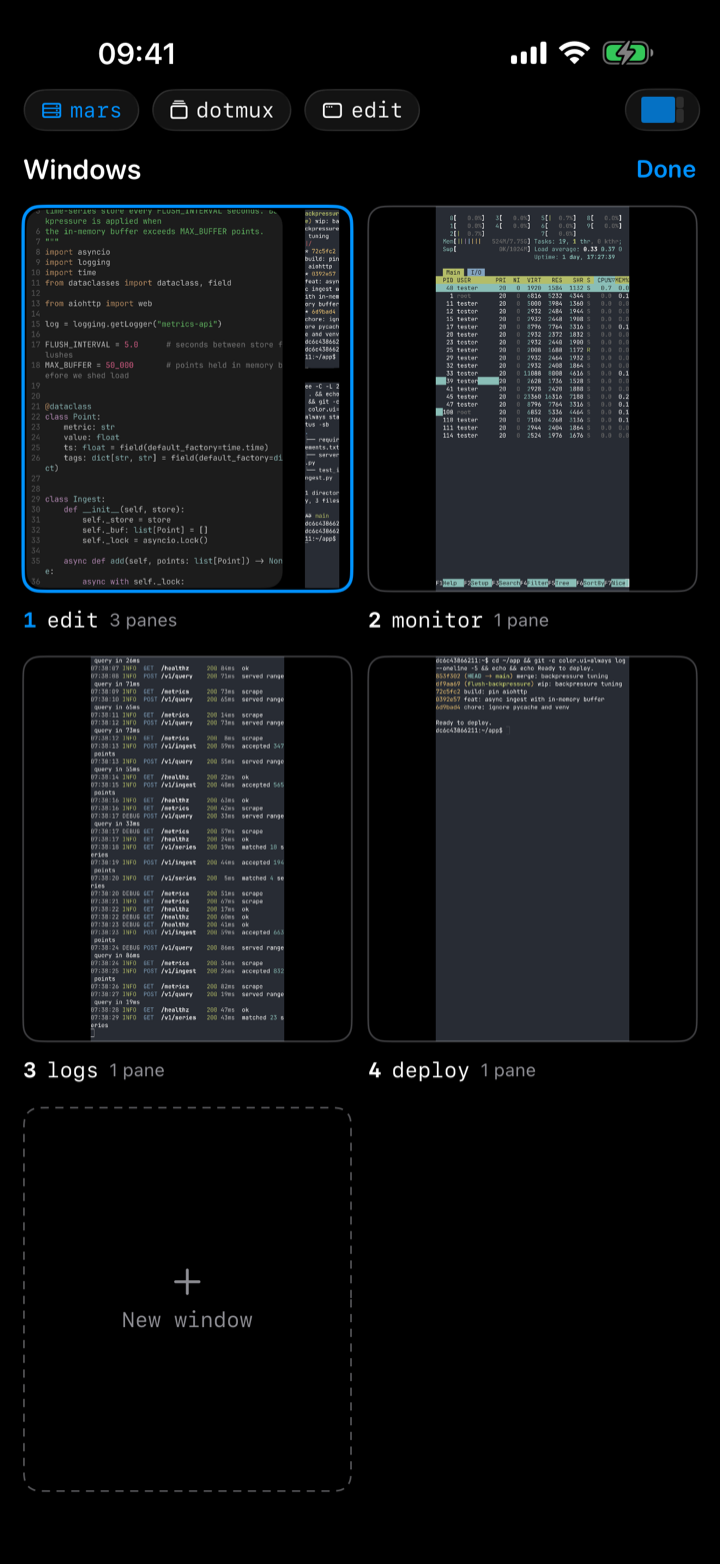
Names like bash and 3 don't tell you much. So the window picker doesn't list names — it shows a live tile of each window, its real layout and real output, updating while you look at it. The editor is the one with code in it; the log tail is the one scrolling. The pane picker does the same thing one level down, and a New window tile sits at the end.
Tiles render the window as tmux describes it — a split window shows its splits, a zoomed pane fills the tile. They're read-only: tap one to go there.
Split, resize, and close panes
Splits are real native views, not regions of a character grid. Open the pane menu — the pane button in the tab bar, a long-press on any unfocused pane, or a right-click with a trackpad — and pick:
- Split Right or Split Down to divide the current pane.
- Resize to nudge the boundaries — or just drag the divider between two panes, on iPhone as well as iPad.
- Equalize to even out a lopsided layout, and Close Pane… (always confirmed) to remove one.
With a hardware keyboard it's the shortcuts you already know: ⌘D split right, ⇧⌘D split down, ⇧⌘W close, ⌃⌘-arrows to resize.

The minimap — every pane on an iPhone screen
A phone screen fits one pane comfortably, so dotMux shows the focused pane full-screen and draws a small, layout-proportional minimap in the tab bar. Tap it and it expands into a pane picker — live tiles of the panes themselves, each labelled with its running command; tap a cell to focus it, or long-press for the pane menu. Focus tracks the server both ways — tap a split to focus it, and when another client moves the active pane, dotMux follows.

Sessions: list, switch, create, kill
Tap the session name in the terminal chrome to see every tmux session on the host — attached ones marked ●, the current one ✓. Picking one switches the attachment in place: tabs and splits rebuild for the new session. From the same picker you can create a named session or kill the current one — with others present, dotMux switches you to the next session first so the connection survives; killing your last session warns you it disconnects.
Each host remembers the session you left, so connecting again lands you right back in it. If it vanished server-side, a recovery alert offers to recreate it or attach to another.
Sharing the window with other clients
tmux sizes a window to its smallest attached client. When a laptop attaches to the same session at a different size, dotMux adopts it — letterboxing the terminal and showing a badge that names the other client. Type, or tap the badge, to reclaim your full size.
Scrollback that behaves
dotMux keeps a deep local scrollback, far past tmux's default, and restores it when a surface rebuilds. Swipe to scroll it — unless the app in the pane (htop, vim, Claude Code) has captured the mouse, in which case your swipe drives its viewport instead. When you're done, Disconnect from the terminal chrome ends the connection cleanly.
§3The keyboard
helper bar · full customization + JSON export/import · sticky modifiers · arrow joystick · command composer · snippets · overflow · hardware shortcuts
iOS's software keyboard can't produce Esc, Ctrl, Tab, or arrow keys at all. dotMux adds a helper bar — an accessory row that sits just above the keyboard with the keys terminals actually need. Pair a hardware keyboard and the bar steps aside; those keys come through directly.
Make it your own
The bar isn't fixed. In Settings → Keyboard → Customize Keyboard Bar you can add, remove, and reorder every element, with a live preview of the result:
- Special keys (Esc, Tab, arrows), the full F1–F12 range, and Ctrl combos like ^C ^D ^Z.
- Shell symbols, and your own custom text snippets for commands you type all the time.
- Widgets like the joystick and composer, group dividers, and a draggable "Pinned to the right" boundary — with Reset to Default one tap away.
Happy with your layout? Export it as a JSON file from the same screen to back it up or carry it to another device, and Import to bring it back — imports are validated (foreign, newer, or empty files are rejected) and confirmed before they replace what you have.

Sticky modifiers
The leading key on the bar is a modifier picker: tap it to arm Ctrl for the next key, double-tap to lock it, tap again to unlock. Long-press to switch it between Ctrl, Alt, and Shift. So a Ctrl-C is just: tap Ctrl, tap C.
The arrow joystick
A compact drag-pad snaps to the four arrow directions with press-and-hold auto-repeat — ideal for moving the cursor in vim or walking back through shell history without hunting for tiny arrow keys.
Drafting long commands
For a long command, or a multi-paragraph prompt to an agent like Claude Code, tap the compose key. It opens a multi-line drafting sheet; write as much as you like and send it in one go as a single bracketed paste. Your draft survives backgrounding and dismissal, and a Press Return toggle decides whether it runs on send or just lands in the prompt for you to review.

Snippets — the commands you keep retyping
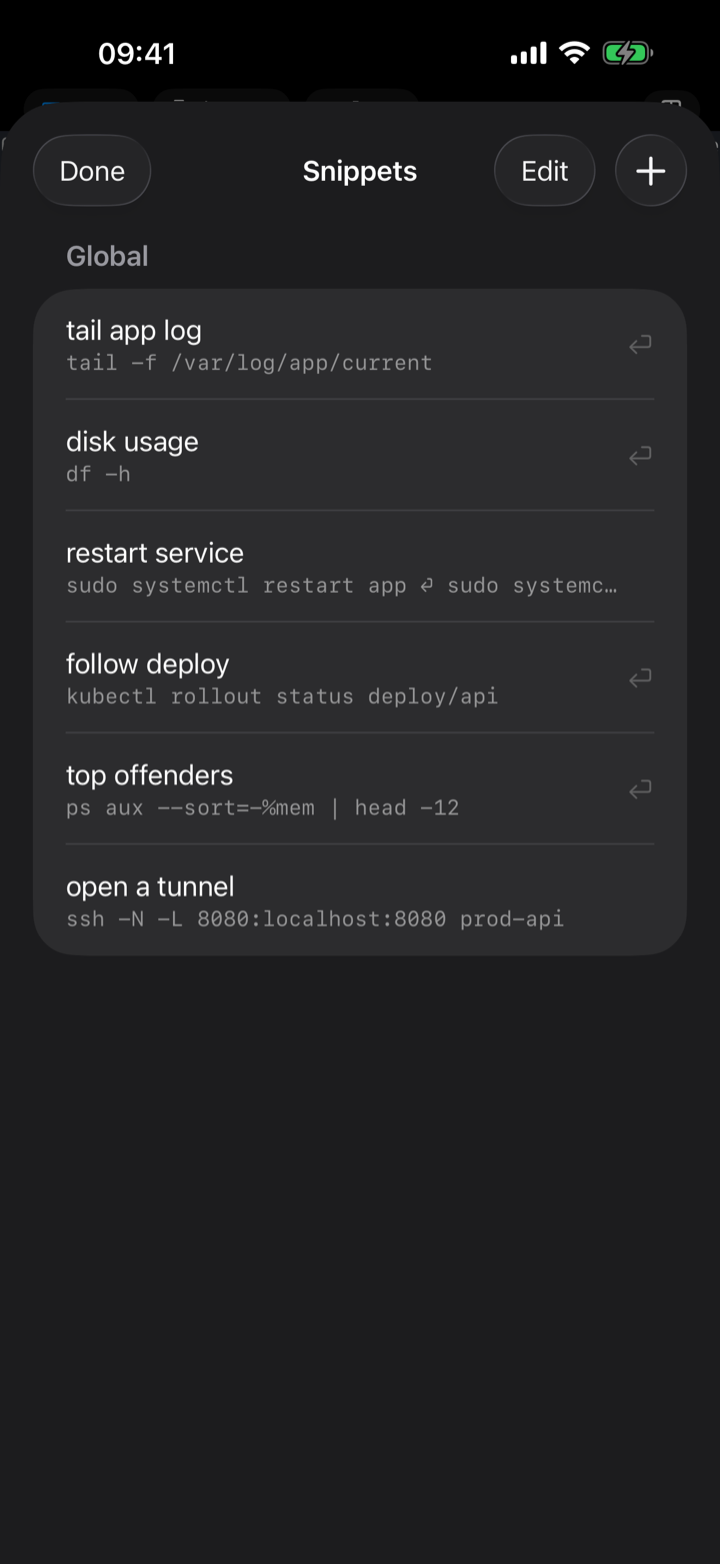
Some commands you type a hundred times: the log tail, the rollout status, the df -h. Save them as snippets and run them from the keyboard bar instead. Each snippet is a name and a command, and a Press Return toggle per snippet decides whether it runs on tap or just lands in the prompt for you to finish.
- Global snippets are available on every host; per-host snippets only appear on the host you saved them for — so kubectl rollout status doesn't clutter the bar on your NAS.
- A snippet can hold more than one command; they're sent in order.
- Reach them from the snippets key on the helper bar, and put your favourites directly on the bar as keys in the editor above.
More room, more keys
The "…" overflow menu holds extra keys (home, end, page-up/down, ^C by default) and is itself customizable in the editor. When you want the whole screen for output, the hide-keyboard key drops the keyboard while the bar stays docked at the bottom; tap the terminal to raise it again.
Hardware keyboard shortcuts
On a hardware keyboard, dotMux speaks the shortcuts you'd expect — hold ⌘ to see the full HUD:
- ⌘T new window · ⌘W close window · ⇧⌘] / ⇧⌘[ next / previous window · ⌘1–9 jump to a window.
- ⌘D / ⇧⌘D split · ⇧⌘W close pane · ⌃⌘-arrows resize · ⌘C copy the selection.
§4Copy & paste
selection & copy (even in full-screen apps) · buffer mirroring · text paste & Allow Paste · image paste for Claude Code
Selecting and copying text
In an ordinary pane — a shell prompt, a log — long-press the text to get an iOS selection with drag handles and a Copy menu, extending character by character. Full-screen apps like Claude Code, htop, and vim are different: they capture the mouse and re-wrap their own text, so dotMux hands your gesture to the app:
- Long-press, then drag in one motion — the app renders its own highlight as you sweep, and on lift its copy lands on your clipboard (with a success haptic). A line that was wrapped on screen arrives as one logical line, no stray breaks.
- Long-press without dragging — after a moment dotMux falls back to its own handle selection, copying exactly what's on screen, wrap points and all.
The instant app-copy handoff needs tmux 3.4 or newer on the host; dotMux configures the rest. There's also an opt-in Mirror tmux Buffer Copies (Settings → Terminal) that drops text you copy in any attached tmux client — copy-mode on your laptop, say — onto this device's clipboard too.
Pasting text — and iOS's "Allow Paste"
The paste key reads your clipboard straight into the focused pane. The first time you paste something copied in another app, iOS shows its Allow Paste prompt; tap Allow. If you'd rather not be asked each time, Settings → Paste has a shortcut into dotMux's iOS Settings page, where Paste from Other Apps → Allow makes it automatic.
Pasting images into Claude Code
A headless SSH box has no clipboard, so the CLI you're running can't reach an image on your device. dotMux bridges it: copy an image, hit paste, and the bytes are uploaded over a second SFTP channel on your existing connection into ~/.dotmux/paste/, and only the resulting path is dropped into the pane. In Claude Code that bare path attaches inline as [Image #1]; any tool that takes an image by path can use it too.
- Images are normalized to a supported format and size (HEIC becomes PNG or JPEG; anything that can't be brought under the cap is dropped with a failure haptic rather than wedging the session).
- GPS and other photo metadata is stripped on-device before upload, and uploaded files are owner-only and self-cleaning — a few kept per window, older ones pruned, and a window's files removed when you close it.
- No Enter is sent, so you add your prompt and submit when you're ready. Plain text paste is unchanged; an image just takes precedence when the clipboard has one.

§5Links
auto-detected URLs & OSC 8 hyperlinks · a confirm sheet with the real destination · in-app or default browser
URLs in your output (auto-detected, plus explicit OSC 8 hyperlinks) are tappable. Because a terminal is a place where a link's visible text and its real destination can differ, dotMux shows a confirm sheet with the actual URL before it opens anything — Open, Copy, or Cancel. In Settings → Links you choose whether links open in-app or in your default browser, and can turn the confirm step off if you trust your own output.

§6Port forwarding
local forwards over your live connection · loopback-only binding · the Forwards panel · the in-app browser
Plenty of what runs on a server has a web UI — a dashboard, a notebook, an admin panel — bound to localhost so it isn't exposed to the network. dotMux gets you to it without exposing anything: a local port forward carried over the SSH connection you already have open.
Set one up
Forwards belong to the host record, so you configure them once, in the host editor. Each one is a local port, a remote host, and a remote port:
- Pick a local port above 1024 (iOS can't bind privileged ports).
- Name the target as the server sees it — localhost means the server itself, and any name the server can resolve works, so you can reach a database box the server can see but your phone can't.
- Save. The forward is established right after the next successful connect, and torn down when you disconnect.
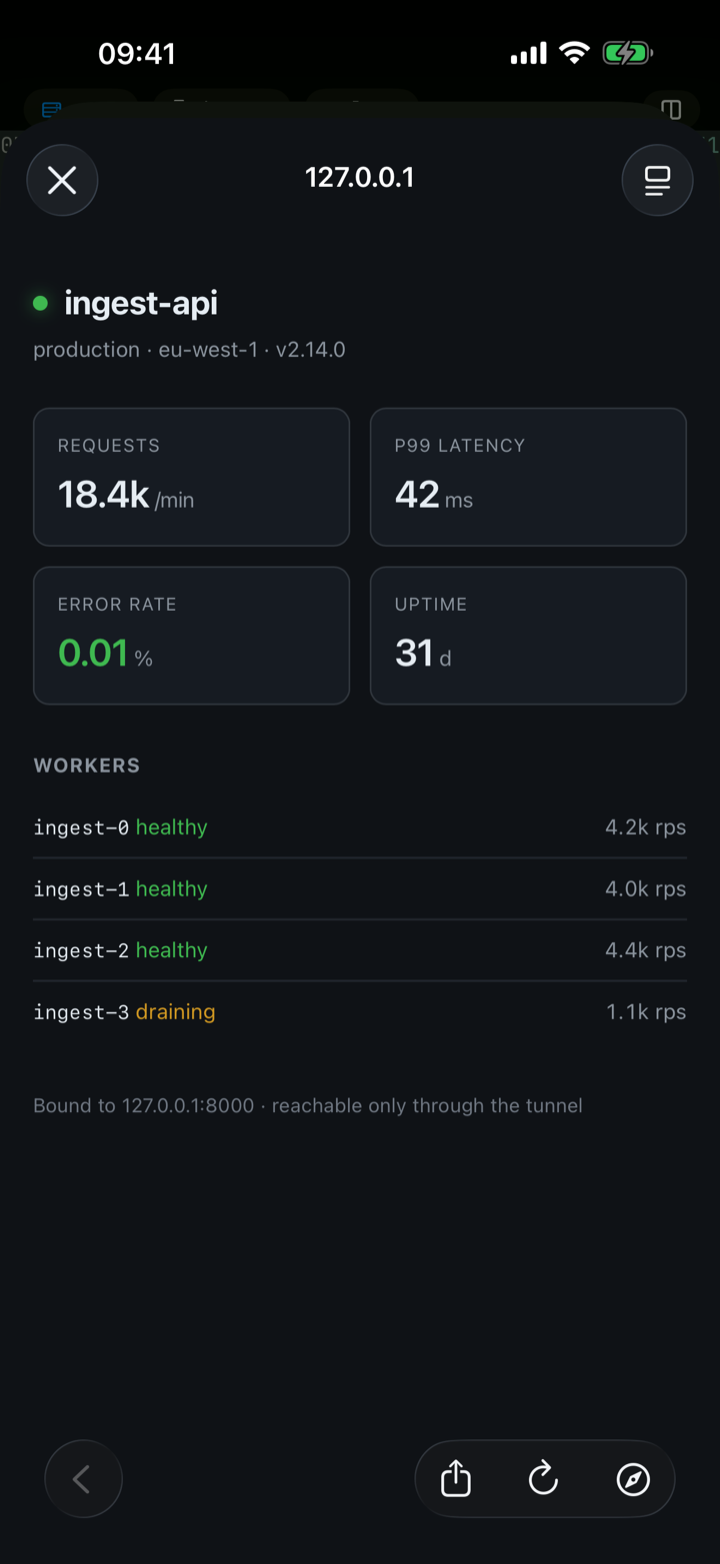
The listener binds 127.0.0.1 only — device-local. Nothing else on your network can reach it, even on shared Wi-Fi.
The Forwards panel
Open Forwards from the session menu to see every forward on this connection and its state: connecting, active, or failed with the reason. Tap the Open button on an active row and dotMux opens http://127.0.0.1:port in an in-app browser — your dashboard, one tap from the terminal, no VPN and no port exposed.
Reverse and dynamic (SOCKS) forwarding aren't supported; this is the local leg only.
§7Automation & Shortcuts
two actions · background vs tmux mode · structured output · per-credential Background use
dotMux publishes App Intents, so Shortcuts, Siri, and automations can drive it. There are two actions:
- Connect to Host — opens dotMux on a saved host, optionally typing a command into the session. This is the "show me a terminal" action, and the one with a Siri phrase.
- Run Command in Background — runs a command on a saved host without opening the app and hands the result back to your shortcut as Output, Error Output and an Exit Code, so you can branch on it, notify on it, or feed it onward.
Two ways to run
The background action's Run parameter picks between them:
- In the background (the default) — waits for the command to finish, subject to a timeout you set, and returns its output. Right for a check: disk space, a health endpoint, a queue depth.
- In a tmux window — starts it in a detached tmux window and returns immediately. It keeps running after the connection closes, which is what you want for a deploy or a build. Name the window and choose whether a repeat run reuses it or opens a numbered one beside it.
Letting an automation use a credential
An automation that fires while your phone is in your pocket can't answer a Face ID prompt — a background process has no screen to show one on. So unattended use is opt-in per credential, from Credentials → Background use:
- Never (the default) — Face ID every time, as in §9. Shortcuts that need this credential in the background will refuse, and say so.
- While this device is unlocked — automations can use it whenever the device is unlocked.
- Anytime, even locked — also runs with the device locked in your pocket, for triggers like a time of day or arriving somewhere.
The boundary is enforced by the iOS Keychain itself, not by an app-side flag: at "While unlocked", a locked-device run is refused by the system regardless of what dotMux does. Two things worth knowing before you raise a credential: anything above "Never" also stops dotMux asking for Face ID when you connect with that credential by hand, and the choice is per credential — so a dedicated automation key, scoped on the server, is a better fit than opening up the key you use everywhere.
§8Make it yours
10 themes · 6 fonts · font size & pinch-to-zoom · an extra iPhone row · Keep Screen On · launch screen
Fonts and themes
In Settings → Terminal, pick from six monospaced fonts — JetBrains Mono (the default), Fira Code, Hack, IBM Plex Mono, Menlo, or Courier New — and ten color themes: Default, Dracula, Nord, Solarized Dark, Gruvbox Dark, One Dark, Tokyo Night, Catppuccin Mocha, Solarized Light, and GitHub Light. A live preview sits right above the list, and both apply instantly to open sessions. The app chrome even shifts light or dark to match the theme you choose.

Bring your own theme
Already have a palette you like on the desktop? Import it. Under Settings → Theme → My Themes, dotMux reads Ghostty theme files and iTerm2 .itermcolors files, from Browse Files, a paste, or straight From URL (https only) — so a theme in a public repo is a copied link away. It's free for everyone, no unlock needed.
An import is a snapshot, not a link: dotMux parses the file once, keeps only the colors — background, foreground, cursor, selection, and the 16-color palette — and stores that. Nothing else in the file is carried over (a Ghostty theme file is a full config file and can set anything; the rest is discarded, not applied), it works offline afterwards, and a source that changes later can't touch a theme you already imported.
The right size
Set the terminal font size from the stepper (4–32 pt), or just pinch to zoom on the terminal — a transient pill shows the live columns × rows as you go. Pinch-to-zoom lives in the same settings if you'd rather turn it off.
A little extra room
On iPhone, dotMux reclaims the dead space at the top of the screen for one more terminal row — small, but every line counts on a phone.
Keep the screen awake
Reading long output or watching a build? Turn on Keep Screen On (Settings → Terminal) and the display won't dim while dotMux is in the foreground with a live connection. It's off by default, and scoped so it never keeps your screen awake in the background.
§9Security & privacy
two Face ID layers · privacy cover · on-device secrets · zero data collection
dotMux runs no servers and has no account, so there's nothing to breach on our end. What protection there is lives on your device — and it's layered.
Two layers of Face ID
There's an app-lock: Face ID (with passcode fallback) gates the whole app on launch and every time you bring it forward. And there's a per-credential check — each stored key or password is gated again at the moment it's used (keys require biometry; passwords accept device presence). A short grace period, a fixed two minutes, lets a quick return or reconnect through without re-prompting; it isn't something you have to set up.

Where secrets live — and where they never go
Credentials sit in the iOS Keychain and Secure Enclave, marked device-bound ("this device only, passcode required"). They are never synced to iCloud or sent anywhere, and if you remove your device passcode they're erased. Secure Enclave keys can't be exported at all, and only ever sign in-chip.
The privacy cover
Whenever dotMux isn't the active app, an opaque privacy cover hides your terminal contents in the iOS app switcher — a glance at your recent apps doesn't leak what's on screen.
What dotMux collects: nothing
No analytics, no tracking, no ads, no account, no sign-up — the App Store privacy label reads "Data Not Collected," and it's literal. The libraries and fonts dotMux builds on are credited under Settings → About → Acknowledgements, with each component's license text. (The full story is in the privacy policy.)
§10iPad & desk setups
true side-by-side splits · multi-window · hardware keyboard & trackpad
dotMux is a single universal app, but it makes the most of a big screen.
True side-by-side splits
Where iPhone shows one focused pane with the minimap switcher, iPad renders your panes as adjacent native views — an editor, your logs, and a system monitor at once, sized the way tmux says, resizable by dragging the dividers.

Hosts in multiple windows
Open a host in its own window from the connections list (swipe or context menu → Open in New Window), and use iPadOS multitasking to set two sessions side by side — two servers, or two views of the same one.

Pointer, right-click, and the ⌘ HUD
With a keyboard and trackpad attached, dotMux is built for desk use: right-click a pane for its menu, and the full shortcut set from §3 is under your fingers — hold ⌘ for the on-screen list.
§11Free tier & unlock
one free host · $1.99 one-time unlock · restore · offer codes
What's free
dotMux is free, fully featured, for one saved host — tmux control mode, SSH keys, the Secure Enclave, Face ID, iPad multi-window, all of it. Editing or re-pointing that one host stays free too.
Unlimited Hosts — $1.99, once
To save a second host and beyond, there's a single one-time purchase of US $1.99 ("dotMux — Unlimited Hosts"). It's non-consumable and not a subscription — no recurring charge, ever. The paywall appears when you add a second host; you can also unlock it any time from Settings.

Restore and offer codes
The unlock is tied to your Apple ID, so Restore Purchases (on the paywall and in Settings) brings it back on a new device or after a reinstall — you're never charged twice. Got an offer code? Redeem it from Settings → Redeem a Code, or the "Have a code?" link on the paywall.